Processing a PayPoint transaction
Your EPOS system now has integrated PayPoint functionality. This should help make PayPoint transactions quicker, reduce queue sizes by allowing PayPoint transaction on all lanes and also reduce keying mistakes.
Initiating a PayPoint Transaction
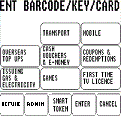
A PayPoint transaction can now be initiated by pressing the PayPoint button on your EPOS screen.
At this point, you should see the PayPoint menu screen which has been designed to be identical to the yellow PayPoint terminal with which you may already be familiar.
Processing a Transaction
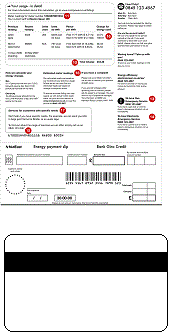
When the PayPoint screen is initially displayed, you can either scan the customer’s barcode or swipe the customer’s magnetic card using the EPOS’ barcode reader or mag swipe reader or you can navigate through the PayPoint menu system. If for any reason, the swipe or scan fails, the card number or barcode can be key entered at this point.
Once the PayPoint transaction has completed the PayPoint screen will disappear and the PayPoint transaction will be added to the customer’s basket. This process can be repeated multiple times to add as many PayPoint transactions to the customer basket as required. Other non PayPoint items can also be added to the basket as normal. At any point until payment, a PayPoint transaction can be removed from the basket by voiding the line in the normal way for your EPOS.
The PayPoint transactions will only be fully processed once the customer has paid. After payment, the PayPoint screen may appear briefly while each transaction is confirmed. Once completed a PayPoint receipt will be printed on the EPOS printer. If for any reason a transaction fails, you will be prompted by the EPOS to refund the customer the value of the failed transactions. Usually, a PayPoint failure receipt will also be printed.
Some EPOS systems allow for PayPoint scans and swipes directly from the sales screen. Swiping or scanning will initiate the PayPoint transaction automatically and proceed directly to the denomination selection screen. Some EPOS systems also have their own mobile phone E voucher shortcut buttons. This allows for the voucher scheme and denomination to be selected with one button press thus circumventing the use of the PayPoint menus. Please confirm this functionality with your EPOS supplier.
Smart Cards and Keys
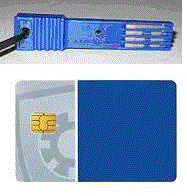
When a customer presents an electricity key, smartcard or contactless card for a PayPoint transaction, the PayPoint device must be used. This type of transaction must be initiated by pressing the “Smart Token” button on the PayPoint screen. Where a PayPoint device is shared by multiple tills, only one till can use the device for smart transactions at any one time. If another till is using the device, the operator will be prompted to wait until the current transaction has completed.
The screen will then prompt you to enter the smart key or card. Once inserted the denomination screen will be displayed and the amount can be entered. The card and/or key must be left in the device until the customer has paid and the PayPoint screen prompts you to remove the card/key from device.
Both a smart card and key transaction can be performed in the same customer basket by pressing the “Smart Token” button again after the first smart transaction has completed. However, both the card and key must always be left in the device until prompted to be removed at the end of the transaction.
Smart cards and/or keys can also be entered into the machine prior to pressing the Smart Token button. To save time, both can also be inserted together. The card will be processed after the first “Smart Token” press, and the key processed once the card transaction has completed and the “Smart Token” button has been pressed for the second time. Where there are multiple PayPoint devices in a store, it is important to know which device is associated to your till. A sticker with the terminal ID can be found at the base of each device to identify each device.
Reversals
Reversals, when allowed, can be performed within 10 minutes of the sale and can be initiated by pressing the Reversal/Refund button on the Control Bar. You will be prompted for the Auth Code, Transaction Number and Transaction Amount which can all be found on the original PayPoint receipt. If the sale involved a barcode or swipe card, the screen will prompt for “customer code” and the media should be scanned or swiped. If the transaction involved smart tokens, these should be inserted into the device. If the reversal is successful, you will be prompted to refund the customer with the correct money and a reversal receipt will be printed. The reversal does not need to take place at the same till as the original sale but can take place at any till using the same PayPoint device.
Receipts
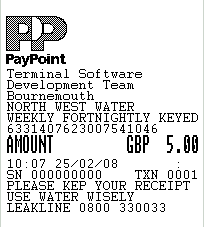
Receipts will be printed for each transaction from your EPOS printer. Your EPOS will also be able to re-print the last PayPoint receipt in case of printer failure. However you should be aware that some PayPoint receipts are not allowed to be duplicated. Some EPOS systems will allow you to re-print more than the last receipt. Bus ticket receipts that need to be inserted into specific wallets may now need to be folded to ensure they fit.
Admin
There is at Admin button on the PayPoint control bar that will allow you access to order PayPoint supplies. A Status button on the Admin menu will show you which PayPoint Terminal ID the till is associated with, the status and time of the connection with the PayPoint server, the time of the last transaction poll and the version number of the PayPoint software. This information may be useful when diagnosing issues. Other than ordering supplies you will not need to use the admin function unless directed to by the PayPoint contact centre.
PayPoint Device
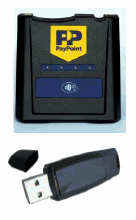
Where there is more than one PayPoint device in a store, each till will be associated to one of the devices. Tills are associated with devices when the PayPoint software is first installed. If a device is removed or the master EPOS that the device is connected to is switched off, then when a PayPoint transaction is initiated, a selection of other devices by terminal ID will be offered and another device should be selected. The EPOS will remain associated to a device until it is unplugged or the master EPOS is switched off. You can also switch devices by going to the Admin menu and pressing Service Discovery.
A device can be unplugged from one EPOS and plugged into another. All tills associated with that device will still remain associated to it, although there may be a slight delay when initiating transactions on each till until it finds the device on the new till. Moving devices is not recommended and should only be done in emergency situations. Unplugging devices altogether will result in a total deactivation of PayPoint services and should never be done.
Transaction Reports
In the Admin menu, there is the ability to enable Transaction logging. This will log every PayPoint transaction in a daily file in the directory c:\program files\paypoint\ppod\reports. Transaction logging can be disabled by clicking the disable Transaction logging button in the Admin menu.
Diagnostics
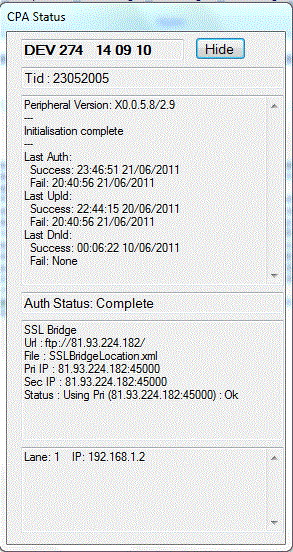
You can determine which PPOS device your EPOS is connected to by going to the Admin menu and pressing CPA Status Dialog. The CPA status window will appear on the screen of the EPOS that the PPOS device is physically attached to. This may or may not be the local machine. This CPA status window provides important diagnostic information which the PayPoint Contact Centre may need if you are having problems. Most importantly, the Auth Status must be showing as Complete for the system to be working properly.